
Want to publish your writing more efficiently? Make sure you use the Styles function built into your word processor when you write your manuscript.

I have just finished editing or proofreading two manuscripts by fellow authors in Independent Authors International. And while both are excellent novels, both were just typed in, with all formatting applied individually to each chapter title.
This is inefficient. I took the time to apply Styles from the word processing program. This has three main effects:
- automating the production of a table of contents, required by some e-book publishing platforms
- ensuring chapter titles, sub-headings and body text remain consistent
- making it faster to make changes and convert your word processing file into e-book format.
It’s easy to do, and there are lots of extra functions that make the whole process even easier, and it really pays off in the re-writing, editing and publishing processes. Here’s are my favourite post-writing tips.
Styles in your word processing program
Microsoft Word is the word processing program I know best, so I’ll use it as an example. It’s also the most popular, and most other programs work in analogous ways.
For example, let’s say you want the title of each chapter to be in big, bold letters, centred on the page. Most people write the words, then format them with
- typeface
- size
- case — upper/capital letters or lower-case
- weight — bold or lightface
- style — italic or roman, strikethrough, etc.
- alignment — justified; flush left, ragged right; flush right, ragged left; or centred
- colour
You can save all these characteristics in a Style in Word. Then all you have to do is select your subheading, for example, and then click on the Style in the menu. One click to set all those characteristics. Faster, easier and consistent.
There’s more you can save in a Style, though.
- indent — for example, whether you want the first line of each paragraph to be indented
- line-spacing — you can control how much space should appear above and below each paragraph, or chapter title, or heading or subheading
- borders—whether you want a box or a border around the paragraph
- Shortcut Key — you can even set up a Ctrl- or Alt-character for a swift shortcut to invoke your style without taking your fingers from the keyboard.
For example, I like to have each chapter start on its own page, with the first line of text about half-way down. So that means I want about 8 lines of space above the title, which in my case is 24-point Futura Medium, flush left.
Instead of hitting the Return key eight times before typing the chapter title, I set up a style I called “ChapterHead.” I wrote the first chapter title, defined it with the cursor and set it for 24-point Futura Medium, flush left.
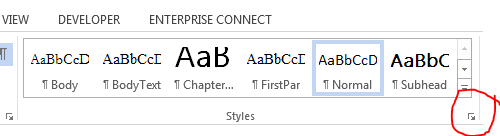 In Word, I selected the heading, then selected the New Style button from the Styles pane. (Click the tiny arrow that points down and to the right in the lower-right corner of the Styles section of the Home ribbon to open the pane. The button I mentioned is the bottom-left icon of that.)
That opens up a window called Create New Style from Formatting. This will show the type characteristics of the selected text: 24-point Futura Medium, Bold, flush left with single-line spacing.
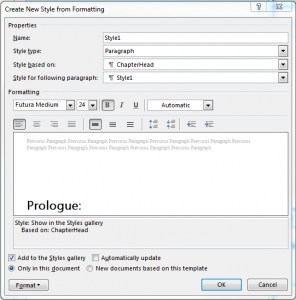 Note the Format button with the little arrow in the bottom left corner of that menu. Clicking that allows you to choose different controls, including Numbering and Paragraph.
Paragraph is the next one to choose. Here, you can decide how much spacing you want between lines. It gives you choices like 1.5 and double spacing, but you can pretty much choose as much as you like, like 1.1 or 1.2 lines. That opens up the spacing between lines in a paragraph — what typographers at one time called “leading” (pronounced “ledding”). I like to set my display text, like headings, at single, and my body text at 1.1 or 1.2 because it improves readability.
So, to get my chapter title to begin half-way down a new page, under Spacing (third section of the menu), I set Before to 96 points. With 12-point line spacing/leading (1.1 spacing for 11 point type), that’s eight lines. On a 5 x 8-inch page, that’s about right. You can play with it until it looks the way you like.
After is 0, but in my case, I like to have a subheading, like this:
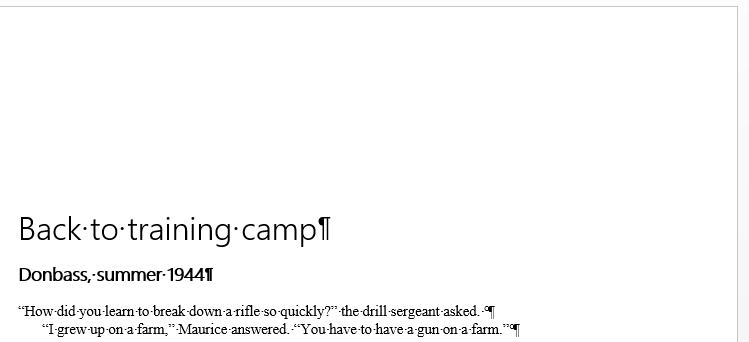
I called the Subheading “Subhead,” and set it to be 14 point Futura Medium, bold, flush left with no space above, and 12 points or 1 line below.
And you may have noticed that the first line of the first paragraph of that chapter is not indented, but the next one is. That’s deliberate, but the subject of another blog post. (By the way, if you prefer to double-space between paragraphs, all you have to do is edit the style so that there is 6 or 12 points of space after the paragraph.)
Then, at the end of every chapter, I insert a New Section break. That forces the program to create a new blank page, and when I type the chapter title and set it for ChapterHead style, I get exactly that white space above it that I wanted. Easy-peasy.
In a future post, I’ll write about how to use Sections to help get exactly the format you want in your book.
Efficiency
The problem with doing all of this to each individual chapter heading, sub-heading, first paragraph and so on is that it’s time-consuming and, worse, invites errors. You could easily forget to add the right amount of space above or below the heading or to not indent the first line of text, or to indent every following paragraph.
Another advantage is that, if you want to change the typeface for your chapter title or subtitle, or the amount of indent for each paragraph of text, or any other characteristic, all you have to do is go to the Styles pane (or the ribbon), right-click on the style in question, select Modify, make the change, and the program will apply it automatically to every instance in your document, no matter how long.
There are lots of cascading benefits of using Styles intelligently. I’ll write about them in the next blog post.
Till then, happy writing!
Permalink